The control for the evaporative cooler is on the wall of the upstairs main-floor hallway. Please note the 3 NEST thermostats upstairs and down operate HEAT only and should all be off if a guest wishes to operate the cooler.
When the evaporative cooler is running, please have an upstairs window cracked a few inches to allow proper airflow. It is also recommended to have all the doors upstairs open for ideal air circulation.
Operating Instructions
Automatic Operation
- The fan and water pump are controlled automatically to achieve the desired comfort level.
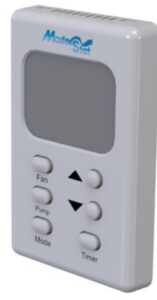
- Automatic operation is activated by pressing the ‘Mode’ button until ‘Auto’ is displayed on the LCD. The ‘Mode’ button changes the control between Off, Auto and Manual.
- The Set temperature (the target temperature for the control) may be altered by repeatedly pressing or holding the ‘Up’ and ‘Down’ buttons. The LCD will display ‘Set’ rather then ‘Room’ temperature for a short time after pressing the ‘Up’ or ‘Down’ button.
- On starting, if the pads in the cooler are too dry, the fan may be delayed from starting until the pads have absorbed some water. This is called Pre-Wet and lasts for 2 minutes, indicated by ‘Pre-Wet” flashing on the LCD. The Pre-Wet can be bypassed by entering manual mode by either pressing the ‘Fan’, ‘Pump’ or ‘Mode’ button and then pressing the ‘Mode’ button until ‘Auto’ is displayed.
- During automatic operation, the control performs a water purge cycle every 8 or 12 hours of pump operation. This interval can be toggled between 8 or 12 hours by simultaneously holding the ‘Pump’ and ‘Fan’ buttons for 5 seconds. The selected interval is displayed for a short time. Press the Up or Down arrow buttons to change between 8 or 12 hours. This action also starts a manual purge cycle. A purge pump or purge valve, which is not supplied with the thermostat control or evaporative cooler, is required for this operation.
Manual Operation
- The fan speed and pump are set by the user.
- To activate the manual mode from the ‘Off’state, press the ‘Mode’ button until ‘Manual is displayed. If the control is in the ‘Auto’ mode, you can change to manual mode by pressing either the ‘Mode’, ‘Fan’ or ‘Pump’ buttons. Each press of the ‘Fan’ button changes the fan to High, Low or Off. Each Press of the ‘Pump’ button changes the pump status either On or Off.
- The LCD will display ‘Manual’ on the left and the fan and pump settings on the right. The fan speed will be displayed as ‘Fan Hi’ or ‘Fan Lo’. If neither are displayed the fan is off. With the fan and pump both running ‘Cool’ will be displayed. If only the fan is running ‘Vent’ will be displayed. If only the pump is running ‘Pre-Wet’ will be displayed.
Time Delay Operation
Delayed start or stop in ‘Auto’ or ‘Manual’ mode
- The ‘Timer’ button is used to set a delay period between 1 and 12 hours in 1 hour increments.
- If the cooler is operating (in ‘Auto’ or ‘Manual’ modes) when the ‘Timer’ button is pressed, the delay period determines when the cooler switches off.
- If the cooler is off when the ‘Timer’ button is pressed, the delay period determines when the cooler starts in ‘Auto’ mode. The Set
- Temperature will be the last setting when running in ‘Auto’ mode.
- ‘Timer Delay’ and the remaining time are displayed on the LCD while the timer feature is activated.
- You can cancel the Timer function at any time by pressing the ‘Timer’ button. The ‘Timer Delay’ indicator will no longer display on the LCD.
In the event of a power outage
When power is restored after a power failure, the thermostat will resume operation in the mode selected prior to the power outage.
Temperature adjustment
Press the up and down arrow buttons simultaneously for 3 seconds. Using the up or down arrow buttons you may adjust the room temperature plus or minus 3 degrees from the set point. This will allow for small adjustments in the temperature displayed on the LCD.